Introduction to chrome://net-internals/dns History
What Is chrome://net-internals/dns?
The Chrome.//net-internals/dns history tool is a built-in diagnostic page in Google Chrome that allows users to view, clear, and manage DNS cache. It is a useful tool for troubleshooting website loading problems, diagnosing network issues, and ensuring efficient domain name resolution.
Why Is DNS Cache Important?
DNS Chrome.//net-internals/dns history stores previously resolved domain names, allowing faster access to frequently visited websites. However, if a cached entry becomes outdated or incorrect, it may cause website loading errors, which is why clearing the cache can be beneficial.
Key Features of chrome://net-internals/dns History
| Feature | Description |
|---|---|
| View DNS Cache | Displays all stored domain name resolutions |
| Clear Host Cache | Removes all DNS cache entries |
| Analyze DNS Lookups | Provides real-time details on DNS queries |
| Check Expiration Times | Shows when cached entries will expire |
This tool is widely used by developers, IT professionals, and users who experience slow browsing speeds due to DNS misconfigurations.
What Is DNS Cache and How Does It Work?
Definition of DNS Cache
DNS Chrome.//net-internals/dns history is a temporary database stored by web browsers and operating systems. It holds recently resolved domain names and their corresponding IP addresses to improve browsing efficiency.
How DNS Cache Works in Chrome
- A user enters a website URL (e.g., example.com) into the browser.
- Chrome first checks its local DNS cache for an existing entry.
- If an entry is found, the cached IP address is used to load the website.
- If no entry exists, Chrome sends a DNS query to a DNS server.
- The server responds with the correct IP address, which is then stored in Chrome’s cache.
| Step | Process |
|---|---|
| 1 | User enters a website URL |
| 2 | Chrome checks the DNS cache |
| 3 | Cached IP is used (if available) |
| 4 | If unavailable, a new DNS query is sent |
| 5 | DNS response is stored in the cache |
DNS caching reduces website loading time and minimizes network requests, improving browsing performance.
How to Access chrome://net-internals/dns in Google Chrome

Steps to Open DNS History in Chrome
- Launch Google Chrome on your computer.
- Type the following address in the URL bar:
- Press Enter, and the DNS settings page will open.
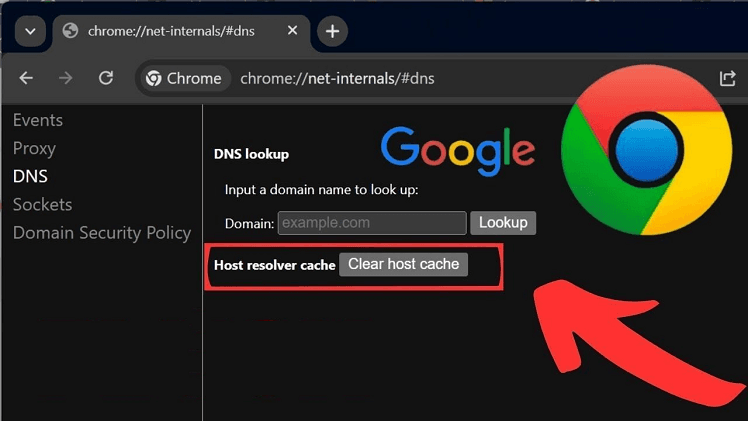
What You’ll See on the DNS Page
- A list of cached domain names and their corresponding IP addresses.
- A button labeled “Clear host cache” to remove stored entries.
- Details about active and expired DNS lookups.
Why Access This Page?
- To check stored DNS records in Chrome.
- To clear the DNS cache for troubleshooting.
- To analyze website resolution issues.
Regularly monitoring DNS cache ensures faster browsing speeds and helps diagnose network-related errors.
How to View DNS History in Chrome
Checking DNS Entries
To see DNS history in Chrome:
- Open Google Chrome and navigate to:
- Scroll down to view a table of cached domain names.
- Check the expiration time of each cached entry.
| Column | Description |
|---|---|
| Domain Name | The website name stored in the cache |
| Resolved IP | The cached IP address for the domain |
| Expiration Time | The time before the cache entry is removed |
Why View DNS History?
- To troubleshoot website not loading issues.
- To verify which domains have been recently accessed.
- To analyze DNS resolution failures.
For users facing frequent disconnections, checking DNS history helps identify expired or incorrect cache entries.
How to Clear DNS Cache Using chrome://net-internals/dns

Why Clear DNS Cache?
- Resolves “This site can’t be reached” errors.
- Fixes outdated domain name resolutions.
- Helps update cached DNS records when a site’s IP address changes.
Steps to Clear DNS Cache in Chrome
- Open chrome://net-internals/dns in Chrome.
- Click the “Clear host cache” button.
- Restart Chrome to apply the changes.
Expected Results After Clearing Cache
- Websites will be reloaded from fresh DNS queries.
- Incorrect DNS entries will be removed.
- Browsing speed may improve if old entries were causing slowdowns.
Managing DNS Issues with Chrome’s Internal Tools
Using chrome://net-internals/#sockets
This tool clears stale network connections that may cause browsing issues.
Steps to Flush Sockets in Chrome
- Open chrome://net-internals/#sockets.
- Click “Flush socket pools”.
- Restart the browser.
When to Use This Feature?
- If websites do not load after clearing DNS cache.
- When experiencing frequent connection resets.
- To resolve stuck connections due to DNS failures.
Combining DNS cache clearing with socket flushing ensures a smoother browsing experience.
Alternative Methods to Clear DNS Cache on Windows and Mac
Clearing DNS Cache on Windows
- Open Command Prompt (Admin).
- Enter the command:
- Press Enter, and a success message will appear.
Clearing DNS Cache on Mac
- Open Terminal.
- Type the command:
- Press Enter, and the cache will be cleared.
| Method | OS | Command |
|---|---|---|
| Windows | Windows 10/11 | ipconfig /flushdns |
| Mac | macOS | sudo killall -HUP mDNSResponder |
These methods remove system-wide DNS cache, which can complement Chrome’s internal DNS cache clearing.
FAQs About chrome://net-internals/dns
What is chrome://net-internals/dns used for?
It helps users view, manage, and clear DNS cache in Google Chrome.
How often does Chrome refresh DNS cache?
DNS cache expires automatically, but some entries may persist until manually cleared.
Does clearing DNS cache delete browsing history?
No, DNS cache and browsing history are separate.
Why is my website not loading even after clearing DNS cache?
Try flushing socket pools using chrome://net-internals/#sockets or clearing system-wide cache.
Can I recover deleted DNS cache?
No, once cleared, the cache cannot be recovered.
Conclusion
The Chrome.//net-internals/dns history tool is an essential feature in Google Chrome that allows users to view, clear, and manage DNS cache for improved browsing performance. Understanding how DNS cache works and knowing how to clear outdated or corrupted entries can resolve website loading issues, improve connection speeds, and troubleshoot network problems effectively.
By regularly checking and managing Chrome.//net-internals/dns history, users can prevent slow-loading websites, outdated domain resolutions, and connection failures. Additionally, combining this method with socket flushing and system-wide DNS cache clearing on Windows and Mac ensures a seamless browsing experience across all devices.


